ASUS RT-AC68U – How to flash TomatoUSB for RT-AC68U
TomatoUSB (Shibby) support for ASUS RT-AC68U Dual-band Wireless AC1900 Gigabit Router is something that I’ve been waiting for quite some time. The Tomato-ARM Team (Shibby, roadkill, Victek) released a public beta for the RT-AC68U on 24 March 2014.
With the TomatoUSB (Shibby) beta, it is time for my to migrate from my ASUS RT-AC66U. In this article, I’ve documented my process of flashing TomatoUSB for RT-AC68U. Previously, I’ve written TomatoUSB (Shibby) flashing guide for ASUS RT-N66U and ASUS RT-AC66U. Do take a look at those guides if you intend to flash TomatoUSB for those devices.
Below are some of the TomatoUSB firmware features that I had found useful:
- Comprehensive QoS (Quality of Service) controls
- VPN Tunnelling support (OpenVPN Server / Client, PPTP Server / Client)
- Captive Portal (based on NoCatSplash)
- VLAN Support
- Multiple LAN support
- Bandwidth Limiter based on IP/MAC
Warning: Flashing third party firmware will void your warranty. I will not be held responsible for anything that goes wrong.
Flashing the ASUS RT-AC68U to TomatoUSB
Overview of the TomatoUSB Flashing Guide
In the following few sections, we are going to:
- Download and install the ASUS RT-AC68U Utility.
- Download the latest TomatoUSB (Shibby) firmware for ASUS RT-AC68U.
- Prepare the RT-AC68U for flashing.
- Flash TomatoUSB (Shibby) onto RT-AC68U using the ASUS Firmware Restoration Utility.
- Preparing TomatoUSB (Shibby) on RT-AC68U before usage.
Download and install the ASUS RT-AC68U Utility
Downloading ASUS RT-AC68U Utility
- Using the web browser, navigate to http://support.asus.com/download.aspx?SLanguage=en&p=11&m=RT-AC68U.

The page should refresh and show the list of files available for your operating system.

The Utilities link should expand to show a list of files available for download.
Installing ASUS RT-AC68U Utility
- Locate the downloaded ASUS RT-AC68U Utility package.
- Extract the contents of the ASUS RT-AC68U Utility
- Install ASUS RT-AC68U Utility by executing Setup.exe and following the on-screen instructions.
Download the latest TomatoUSB (Shibby) firmware for ASUS RT-AC68U
- Using the web browser, navigate to http://tomato.groov.pl/download/K26ARM/.
- Navigate to the directory for RT-AC68U.
- Locate the latest firmware build (e.g. 116).
- Download the firmware (file ending with .trx). If you are not sure which firmware flavour to download, download the one with “AIO” in the filename.
Status Check
By now, you should have installed the ASUS RT-AC68U Utility and downloaded the latest TomatoUSB (Shibby) firmware for ASUS RT-AC68U. let’s proceed to the next section.
Prepare the RT-AC68U for flashing
- Connect the RT-AC68U power adaptor to the RT-AC68U.
- Using a patch cable / LAN cable, connect your computer’s ethernet / LAN port to RT-AC68U’s LAN port 1.
- Ensure the ASUS RT-AC68U is powered off.
- Ensure your computer’s ethernet / LAN port is configured to use DHCP.
- Make sure you have a pointed item (e.g. pen) to press the RT-AC68U’s reset button.
Once you are done, proceed to the next section.
Flash TomatoUSB (Shibby) onto RT-AC68U using the ASUS Firmware Restoration Utility
Preparing the ASUS Firmware Restoration Utility
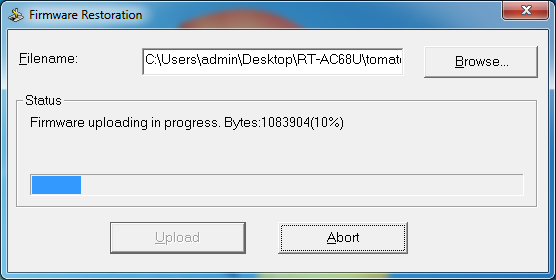
- Launch the ASUS Firmware Restoration Utility on your computer.
- In the Firmware Restoration Utility, browse for the TomatoUSB (Shibby) firmware that you have downloaded earlier.
Do not click the “Upload” button at this juncture.

Starting the ASUS RT-AC68U in emergency firmware restore mode
- Power off the ASUS RT-AC68U.
- Press and hold on to the reset button.
- While holding down the reset button, power on the ASUS RT-AC68U.
- Keep holding the reset button until the power led starts to blink / flash (on and off).
- When the power led starts blinking / flashing, release the reset button.
Flashing the TomatoUSB firmware using the ASUS Firmware Restoration Utility
- While the RT-AC68U’s power led is still blinking / flashing, click on the “Upload” button of the ASUS Firmware Restoration Utility.
The utility should locate the RT-AC68U in rescue mode and attempt to recover the RT-AC68U.


The RT-AC68U will take around 2 to 3 minutes to complete its boot up process.
Final Steps
Preparing TomatoUSB (Shibby) on RT-AC68U before usage
Clearing the NVRAM
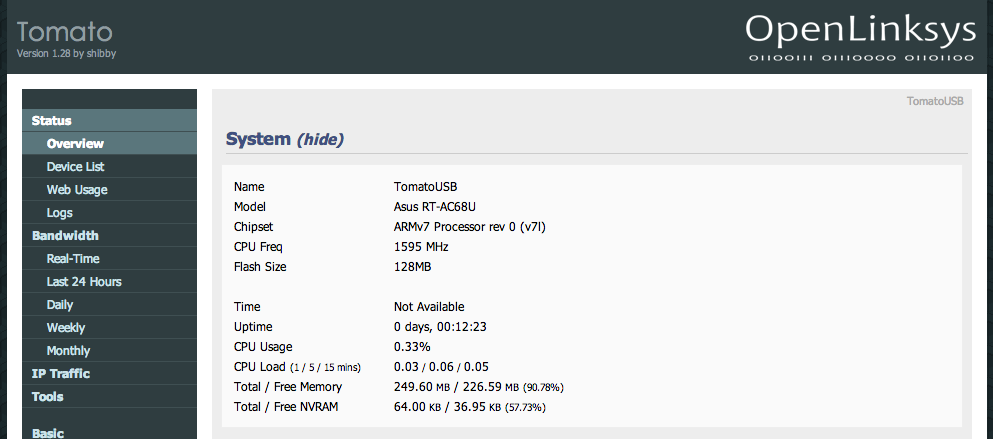
- After the ASUS RT-AC68U has completely booted up (stable led lights for wireless), navigate to the TomatoUSB web admin (http://192.168.1.1) using the default credentials (user: root, password: admin).
You should see the TomatoUSB web administration page. - Navigate to Administration –> Configuration.
- Under “Restore Default Configuration”, select “Erase all data in NVRAM memory (thorough)”.
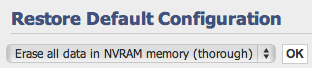
The RT-AC68U should reboot.
Clearing the NVRAM (alternative method)
- Wait for the ASUS RT-AC68U has completely booted up (stable led lights for wireless).
- Locate the WPS button on the RT-AC68U.
- Power off the RT-AC68U.
- Press and hold on to the WPS button and power on the RT-AC68U.
- Wait for the power LED to blink rapidly before releasing the WPS button.
The router should reboot. - Once the router has finish rebooting, you can proceed to use the TomatoUSB (Shibby) on ASUS RT-AC68U.
Congratulations. Your ASUS RT-AC68U Dual-band Wireless AC1900 Gigabit Router has been flashed to use the latest TomatoUSB (Shibby) firmware.