Ledger Nano S Cryptocurrency Hardware Wallet Review
Cryptocurrencies (e.g. Bitcoin (BTC), Ethereum (ETH), Ripple (XRP)) are all over the news lately for their spectacular price movements or them getting stolen from hacked exchanges. For the latter issue, it makes me ponder if I should continue leaving my cryptocurrencies (or rather private keys) with custodians (e.g. Coinbase, Binance) or manage them on my own. Being a techie, I decided to take things in my own hands with the Ledger Nano S hardware wallet.
What are hardware wallets?
Hardware wallets are probably the most robust form of security you can have for your cryptocurrencies. They make (remote) hacking attempts difficult by storing your private keys and signing transactions offline. Most popular hardware wallets have a built-in screen for the user to verify the actions (e.g. transferring cryptocurrencies) before the action is authorised (or signed).
There are a few popular hardware wallets, namely the TREZOR and Ledger Nano S. I decided to go for the Ledger Nano S and here’s why:
| Consideration | TREZOR Wallet | Ledger Nano S |
|---|---|---|
| Coin Support | BTC, Litecoin, Ethereum, ERC-20 Tokens, Zcash, DASH | BTC, Litecoin, Ethereum, ERC-20 Tokens, Zcash, DASH, Ripple, NEO, Vertcoin, Komodo, PIVX |
| Security | Not much details on security certification levels or chip architecture | Dual chip architecture (ST31H320 + STM32F042) Certification level: CC EAL5+ |
| Firmware | Open-source | Closed Ledger application are open-source |
| Portability | 59 x 30 x 6mm | 98 x 18 x 9mm |
| Product Page | TREZOR | Ledger |
| Price | €89 | €79 |
Based on their technical specifications, the Ledger Nano S seems to have native support for more coins; more transparent on its security features; and more portable with its USB flash drive form-factor.
Pricing wise, the Ledger Nano S is also more affordable. I actually paid S$128 for it.
Although I was a little uncomfortable with its firmware being not open source, I can only hope that the team have put in effort to ensure that security is not just by obscurity.
By the way, it works great with MyEtherWallet (MEW). I am using MEW for managing my Tronix (TRX) cryptocurrency as it is a ERC20 token.
Unboxing the Ledger Nano S


In your Ledger Nano S package, you will find the following:
- Ledger Nano S hardware wallet;
- Micro-USB data cable;
- Lanyard;
- Keyring; and
- User manual.

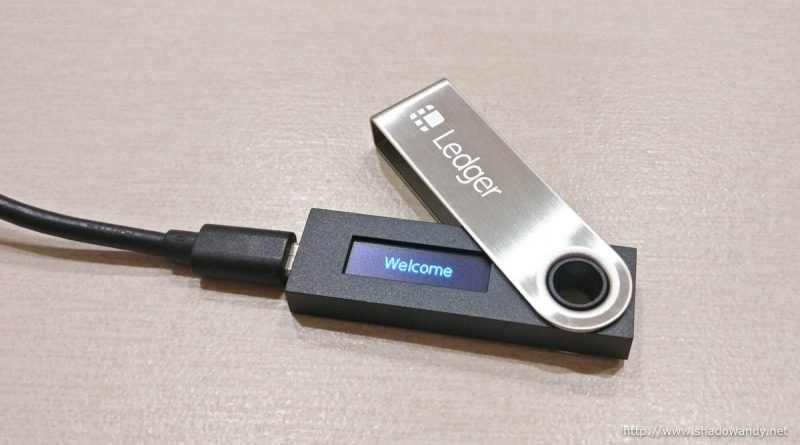
The Ledger Nano S is generally made of plastic. It has a metal sleeve/ jacket to protect the screen and device from knocks and hard objects.
The metal sleeve swivels to show the OLED screen on this side of the Ledger Nano S. The screen can display information with reasonable resolution.

This screen is essential for selecting the Ledger Nano app to launch, input your PIN, verifying actions, authorizing transactions, validating addresses, etc.

The back of the Ledger Nano S. Nothing interesting except for the Latin phrase vires in numeris and it means strength in numbers. Pretty appropriate for cryptocurrencies.

The Ledger Nano S uses micro-USB port for power and communication. Aside from working with Windows, Linux and Mac computers, it also works with my Android phone (through a OTG cable) through the Ledger U2F Bridge app on MyEtherWallet (MEW).

Here are the buttons for navigating the options and apps on the Ledger Nano S. Pressing either one of them navigates through the menu while pressing both together selects the option. For example during PIN entry, press either one will increase (or decrease) the number and pressing both simultaneously fixes the number.
Setting it up
Setting up the Ledger Nano S is straightforward. The on-screen instructions guides you through the entire process. In fact, the most tedious part is writing down the 24 words seed as I had not been writing much ever since I learnt about computers (and keyboards).
Do keep the 24 words safe. I repeat, keep these 24 words safe. They are used to create the private keys that keeps your cryptocurrencies secure.
Once it has been set up, you can download the necessary Ledger apps (e.g. Bitcoin, Ethereum, Litecoin) to start using it to store your cryptocurrencies.
Resetting and Recovering
Another word of advice: Before you actually start transferring cryptocurrencies to your hardware wallet, simulate a Ledger Nano S hardware wallet failure and recover your private keys using the 24 words seed. To simulate the failure, simply reset it and start the process of recovery by entering the 24 words. It is tedious but at the end of the recovery, you will be more confident that the recovery process works and your seed words are copied correct.
Until next time
I just started using the Ledger Nano S and the learning curve wasn’t steep. However, I will need some more time with the hardware wallet to discover any bad points about it. So let’s hope I will write another article on the Ledger Nano S soon!