LG 360 Cam Wireless Remote
The LG 360 Cam is a nice and affordable 360-degree/ VR camera. It is only missing a wireless remote to trigger it to capture precious moments without using the mobile phone. In this post, I will be attempting to create/ DIY a wireless trigger for the LG 360 Cam. I will be posting updates to this article along the way.
| Date | Updates |
|---|---|
| 21 May 16 | Picture taking codes are working! |
| 18 May 16 | HM-10 BLE module finally arrived |
| 04 May 16 | Updated on the initial hardware selection criteria |
| 28 Apr 16 | Some initial probes on LG 360 Cam's WiFi network |
Background
The 360 Cam Manager app for Android and iOS connects to the LG 360 Cam’s WiFi network to instruct the camera to take picture, videos and retrieve live streams from the camera. While doing so, the mobile phone loses Internet connectivity as most-if-not-all mobile phone prioritizes WiFi connectivity over mobile/ cellular data even when there are no Internet connectivity (on WiFi).
Each of the LG 360 Cam creates their own unique WiFi network using some unique detail from the camera:
| Network Name (SSID) | Passphrase | SecurityLGR105_{last 6 digits of serial num}.OSC | 00{last 6 digits of serial num} | WPA2 |
|---|
Assuming the last 6 digits of the camera’s serial number is “123321”, the details of the WiFi network will be as follow:
| Network Name (SSID) | Passphrase | SecurityLGR105_123321.OSC | 00123321 | WPA2 |
|---|
Another point to note is that the 360 Cam Manager app seems to discover nearby LG 360 Cam by listening for the BLE broadcast from the camera.
Initial Probes
Finding out more about the LG 360 Cam
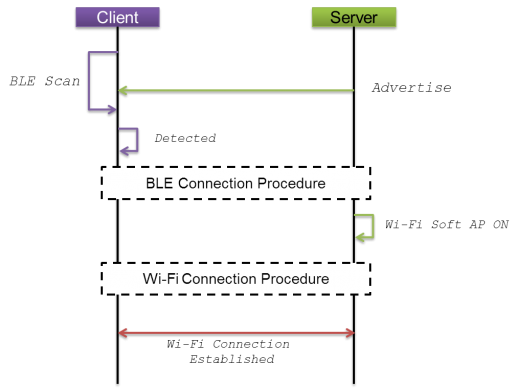
For WiFi devices, the usual reconnaissance will be connecting to its WiFi network and probe it for network services. The LG 360 Cam has got to be running some server/ services in order for it to communicate with the Android or iOS application. This was when I discovered why the LG 360 Cam is fitted with Bluetooth.
Apparently, the LG 360 Cam needs to be contacted on its Bluetooth services before it starts broadcasting it’s WiFi network. This is brilliant in terms of power management as continuous WiFi blasting is going to take a toll on its battery. WiFi network is not necessary when the user is operating the LG 360 Cam via its hardware buttons.
And so, I probed its Bluetooth services, joined its WiFi network and identified the LG 360 Cam’s IPv4 address. After some digging, I managed to find the following information:
| LG 360 Cam's address | Services Port(s)192.168.43.1 | 80, 6624 |
|---|
After sending probes on the service ports, it appears that the LG 360 Cam is running a Web server.
Discovery – LG 360 Cam is using Open Spherical Camera
Piecing all the information together, it seems to suggest that the LG 360 Cam is based on Open Spherical Camera. Tried my luck and sent a request to http://192.168.43.1/osc/info. Eureka.
{
	"manufacturer": "LGE",
	"model": "LGR-105",
	"serialNumber": "123321",
	"firmwareVersion": "R10510d",
	"supportUrl": "developer.lge.com\/friends",
	"endpoints": {
		"httpPort": 6624,
		"httpUpdatesPort": 6624,
	},
	"gps": false,
	"gyro": true,
	"uptime": 7,
	"api": [
		"/osc/checkForUpdates",
		"/osc/commands/execute",
		"/osc/commands/status",
		"/osc/info",
		"/osc/state"
	],
	"apiLevel":"v2"
}
From the above results, I got to know that LG Electronics has got a developer portal at http://developer.lge.com/friends.
Confirmation – BT Connect Procedure before WiFi Connection
While browsing through the developer portal, my earlier observations are confirmed. The LG 360 Cam requires a connection procedure on its BLE before it starts broadcasting its WiFi network.
Experimentations and Validations
Triggering LG 360 Cam picture taking with curl
After a quick browse of the Open Spherical Camera API, I figured that I should be able instruct the LG 360 Cam to take a picture (using curl command).
The instruction/ OSC API request should be directed to port 6624 on the LG 360 Cam as reflected in the results from the earlier “osc/info” query.
I composed the following command, hit the key and I heard the distinctive camera shutter sound from the LG 360 Cam.
curl -X POST -H "Content-Type: application/json" http://192.168.43.1:6624/osc/commands/execute -d '{"name":"camera.takePicture","parameters":{"sessionId":"SID_0000"}}'
Proceeded to validated the result using the official 360 Cam Manager app by checking if a picture has indeed been taken earlier and recorded on the storage. Well, it did – a picture was taken and recorded successfully just by using the above curl command.
It appears that I am on the right track.
To get the LG 360 Cam to start broadcast it’s WiFi network, I first attempted to pair with it via Bluetooth. This pairing initiation process indeed got the LG 360 Cam to start broadcasting it’s WiFi network. The Bluetooth pairing process fails in the end but the WiFi remains connected.
The next step would be determining the appropriate hardware to use (as the wireless remote/ trigger) and the camera functions to be implemented.
Hardware Selection
I came up a few criteria for hardware selection.
Firstly, the LG 360 Cam remote should be handy/ small. The remote should not be bigger than my smart phone. Ideally, it should be smaller than the LG 360 Cam.
Secondly, it should not require loads of power (i.e. the need to bring along a power bank). Instead of using AA/ AAA batteries or power bank, ideally it should be able to operate on 3.3V coin batteries or lithium polymer battery.
Thirdly, it should communicate on BLE and WiFi. This is the basic requirement to communicate with the LG 360 Cam.
Lastly, it should be affordable to build. The entire build hopefully cost less than S$50.
Hardware Choices
The open hardware choices are Raspberry Pi and Arduino (and it’s variants). Both of these devices do not come with Bluetooth and WiFi but can be easily added via external modules.
I am inclined towards Arduino as it has smaller variants compared to the Raspberry Pi.
Choice of Hardware
I got the ESP8266 on hand so I am going to use it as the base. The ESP8266 is a tiny Arduino with WiFi on board. It runs on 3.3V and logic.
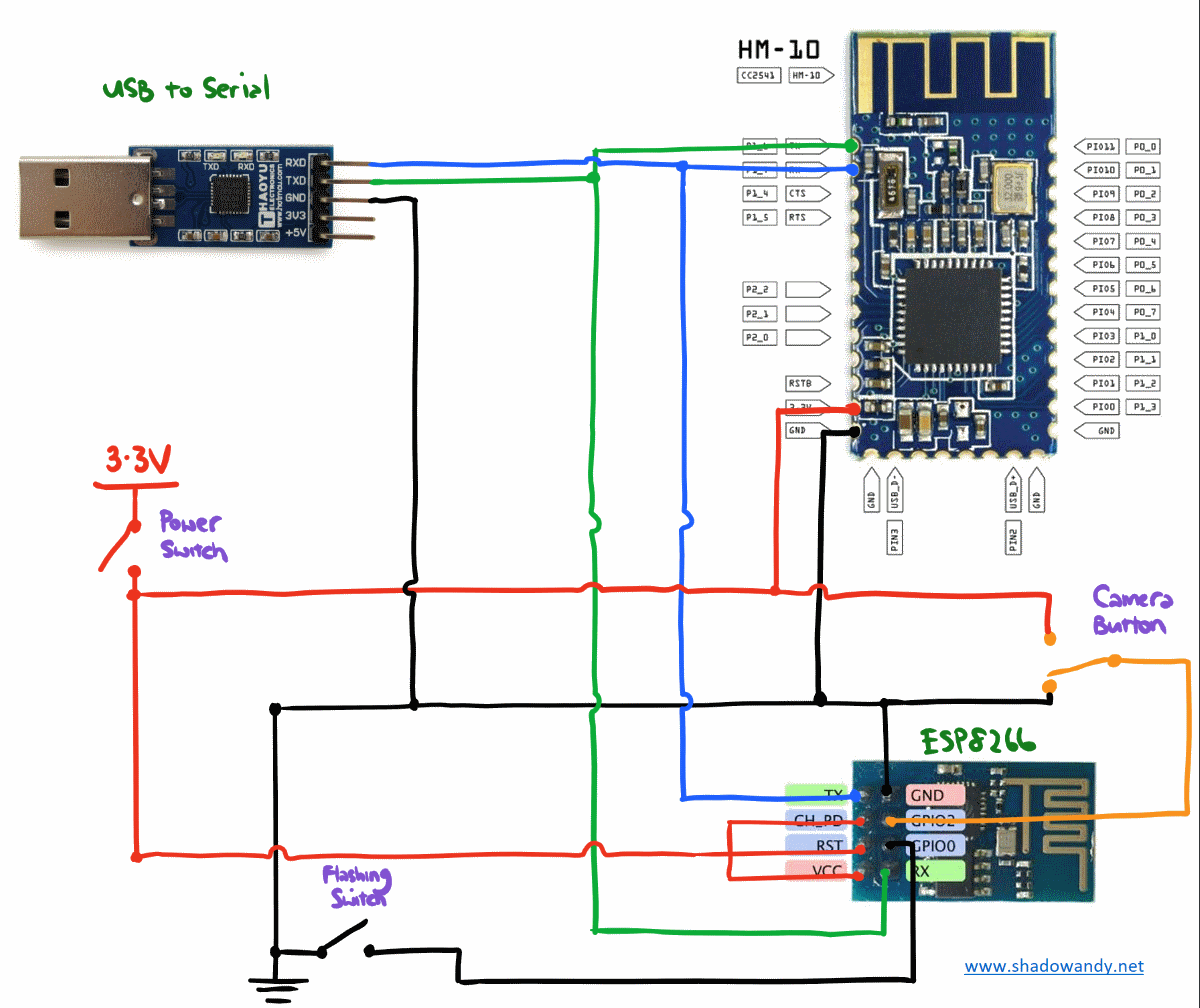
For the Bluetooth module, I settled for the HM-10 (based on CC2250). It can be hooked up to the serial pins on the ESP8266 and easily controlled via serial.print(“AT+Commands”) (in Arduino codes). The good thing about HM-10 is that it works off 3.3V too.
Power wise, I will start off with 3.3V button cell battery before moving towards lithium polymer and USB based recharging.
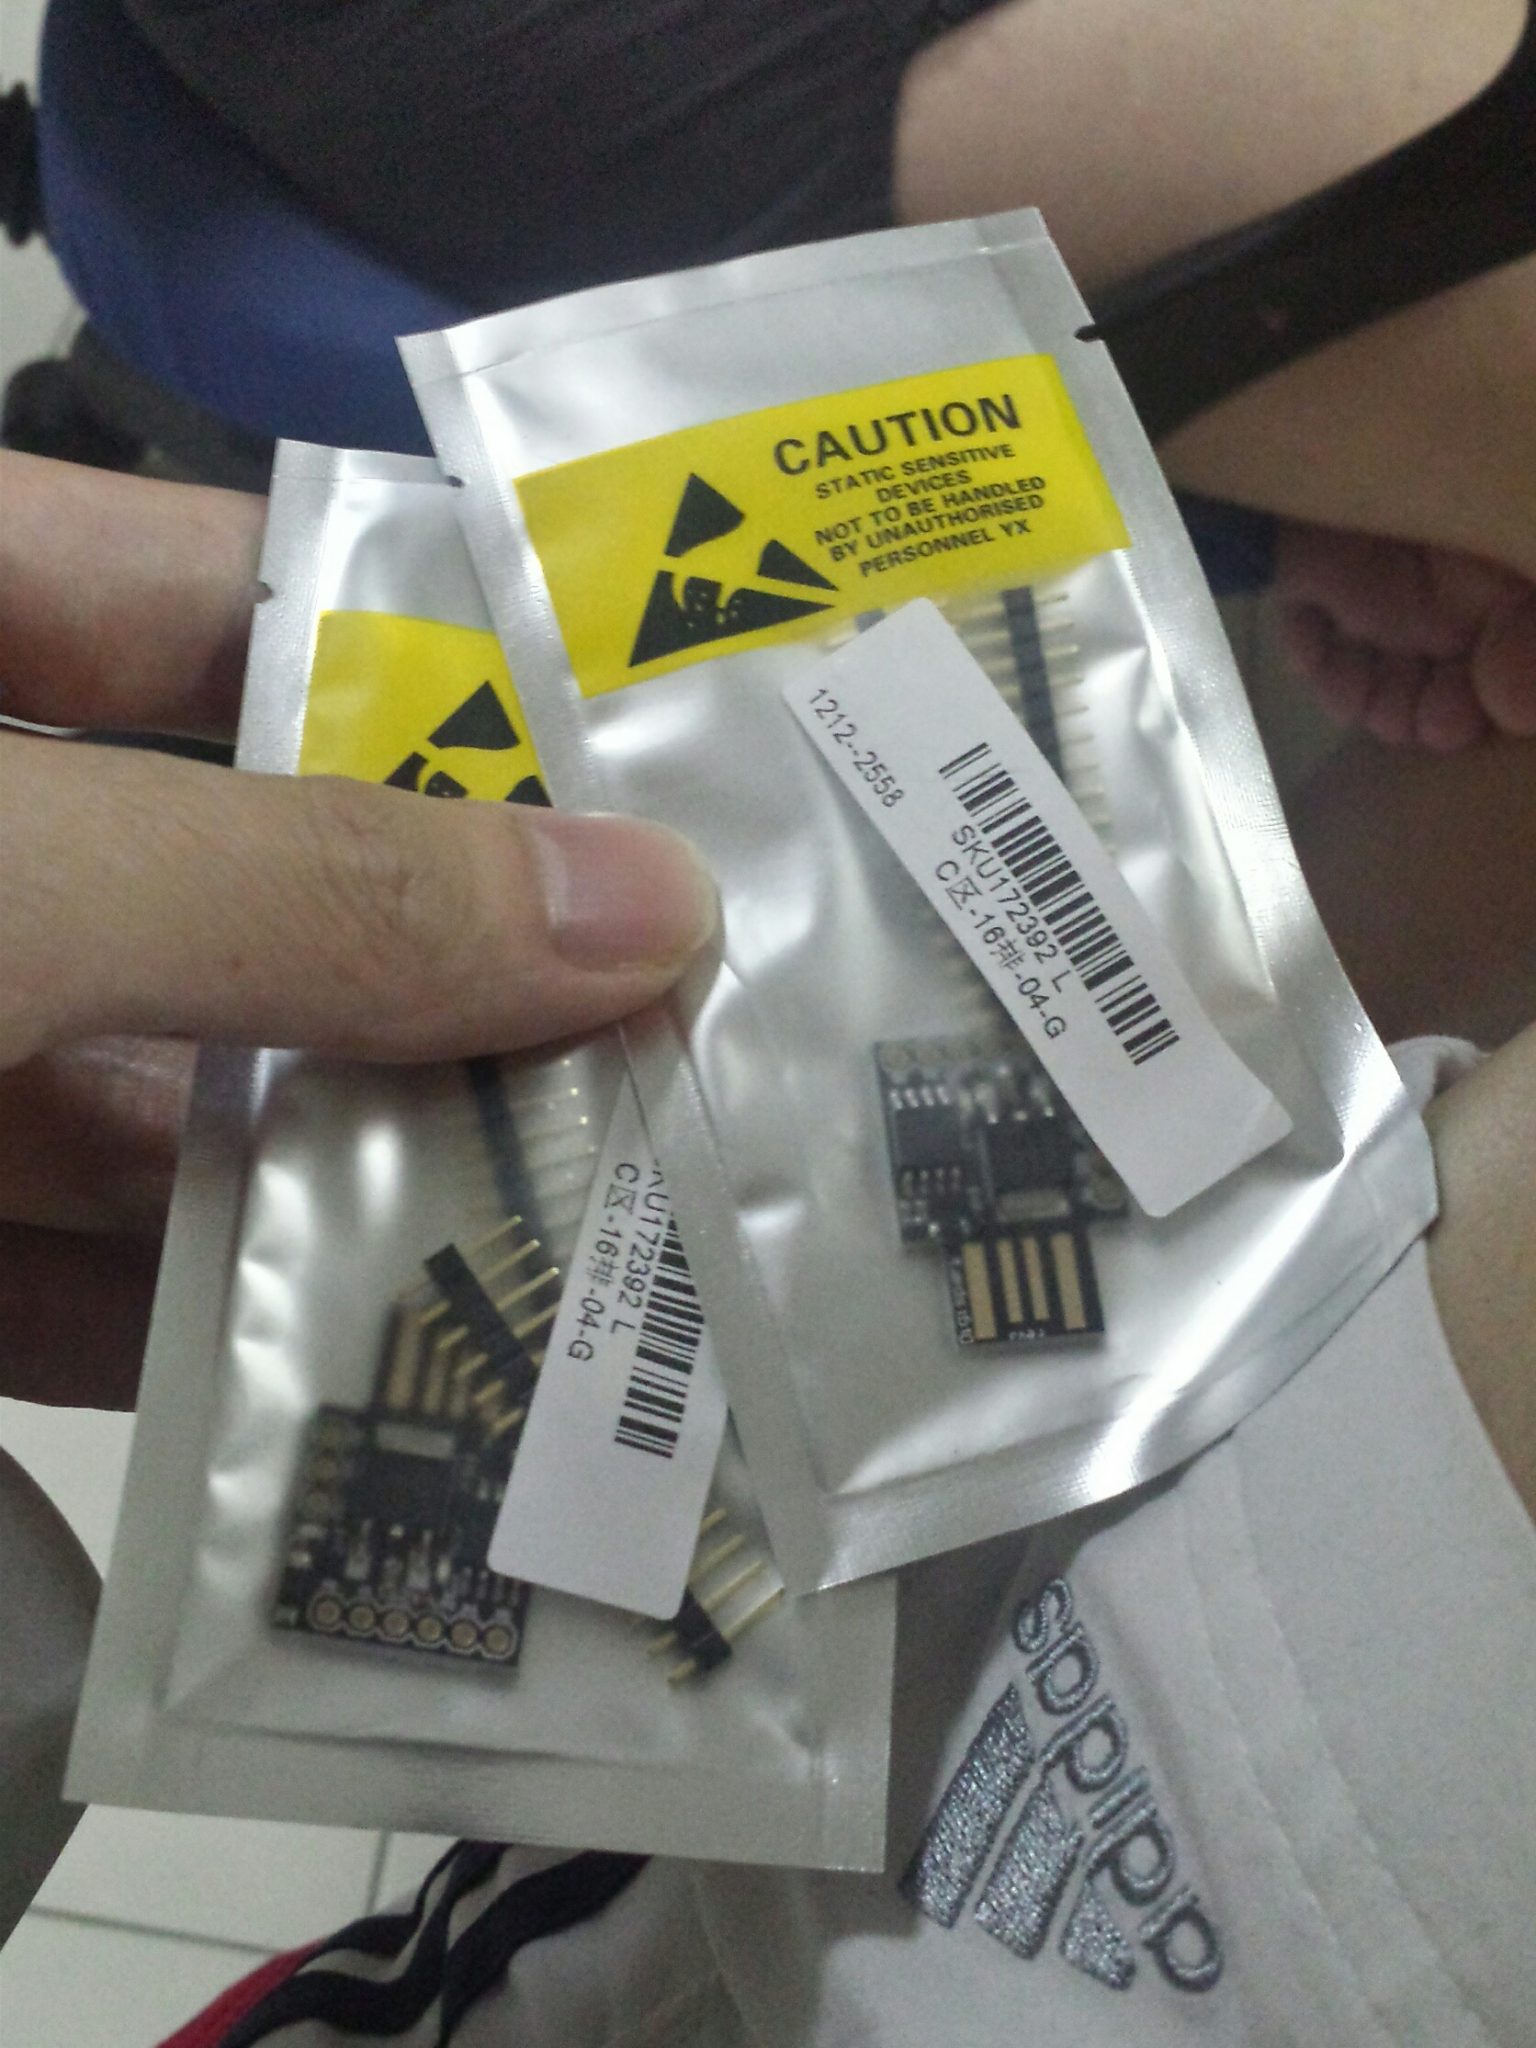
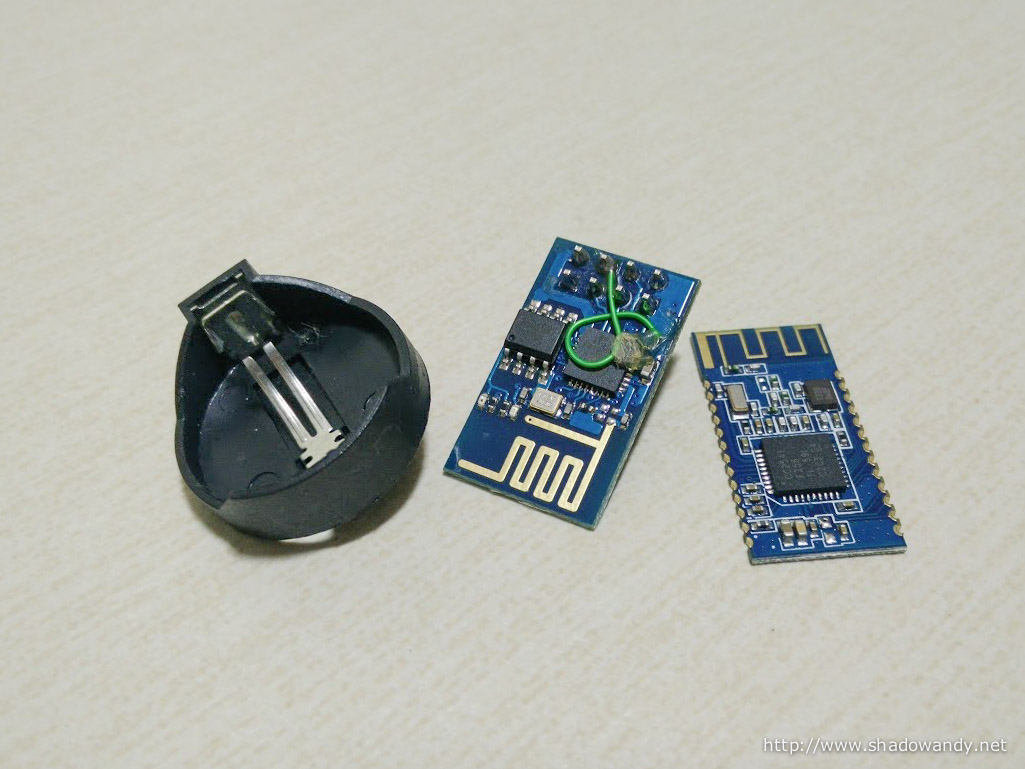
I placed order for the HM-10 Bluetooth module. For the clicky buttons, going to use a pair of wires for the proof of concept before finding contact switches.
Arrival of Core Components
The HM-10 Bluetooth module took roughly two weeks to arrive. In the mean time, I looked up the manual/ instructions for HM-10. The AT commands/ procedure seems pretty straight forward. I guess for a start I should try to do a serial connection to it and attempt connecting to the LG 360 Cam (on Bluetooth).
I am glad that the HM-10 is roughly the same size as the ESP8266 ESP-01 board.
Wiring up and Initial Codes
Wiring up the parts using breadboard
I didn’t have my soldering kit back yet so couldn’t hook up the HM-10 module. The HM-10 BLE module isn’t breadboard friendly so I got to make do with the ESP8266 testing first.
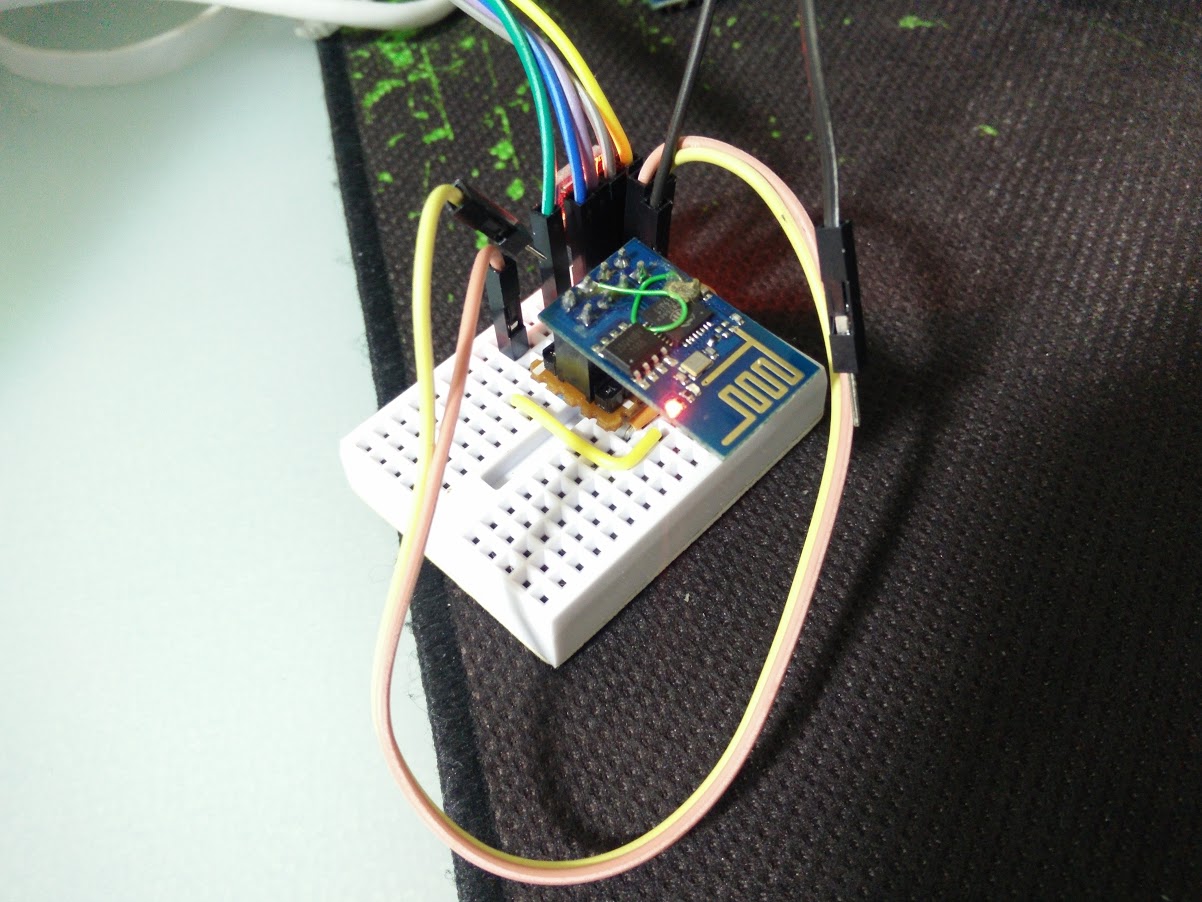
Use two wires (3.3V and Ground) to simulate button presses on GPIO2.
Testing the initial draft codes
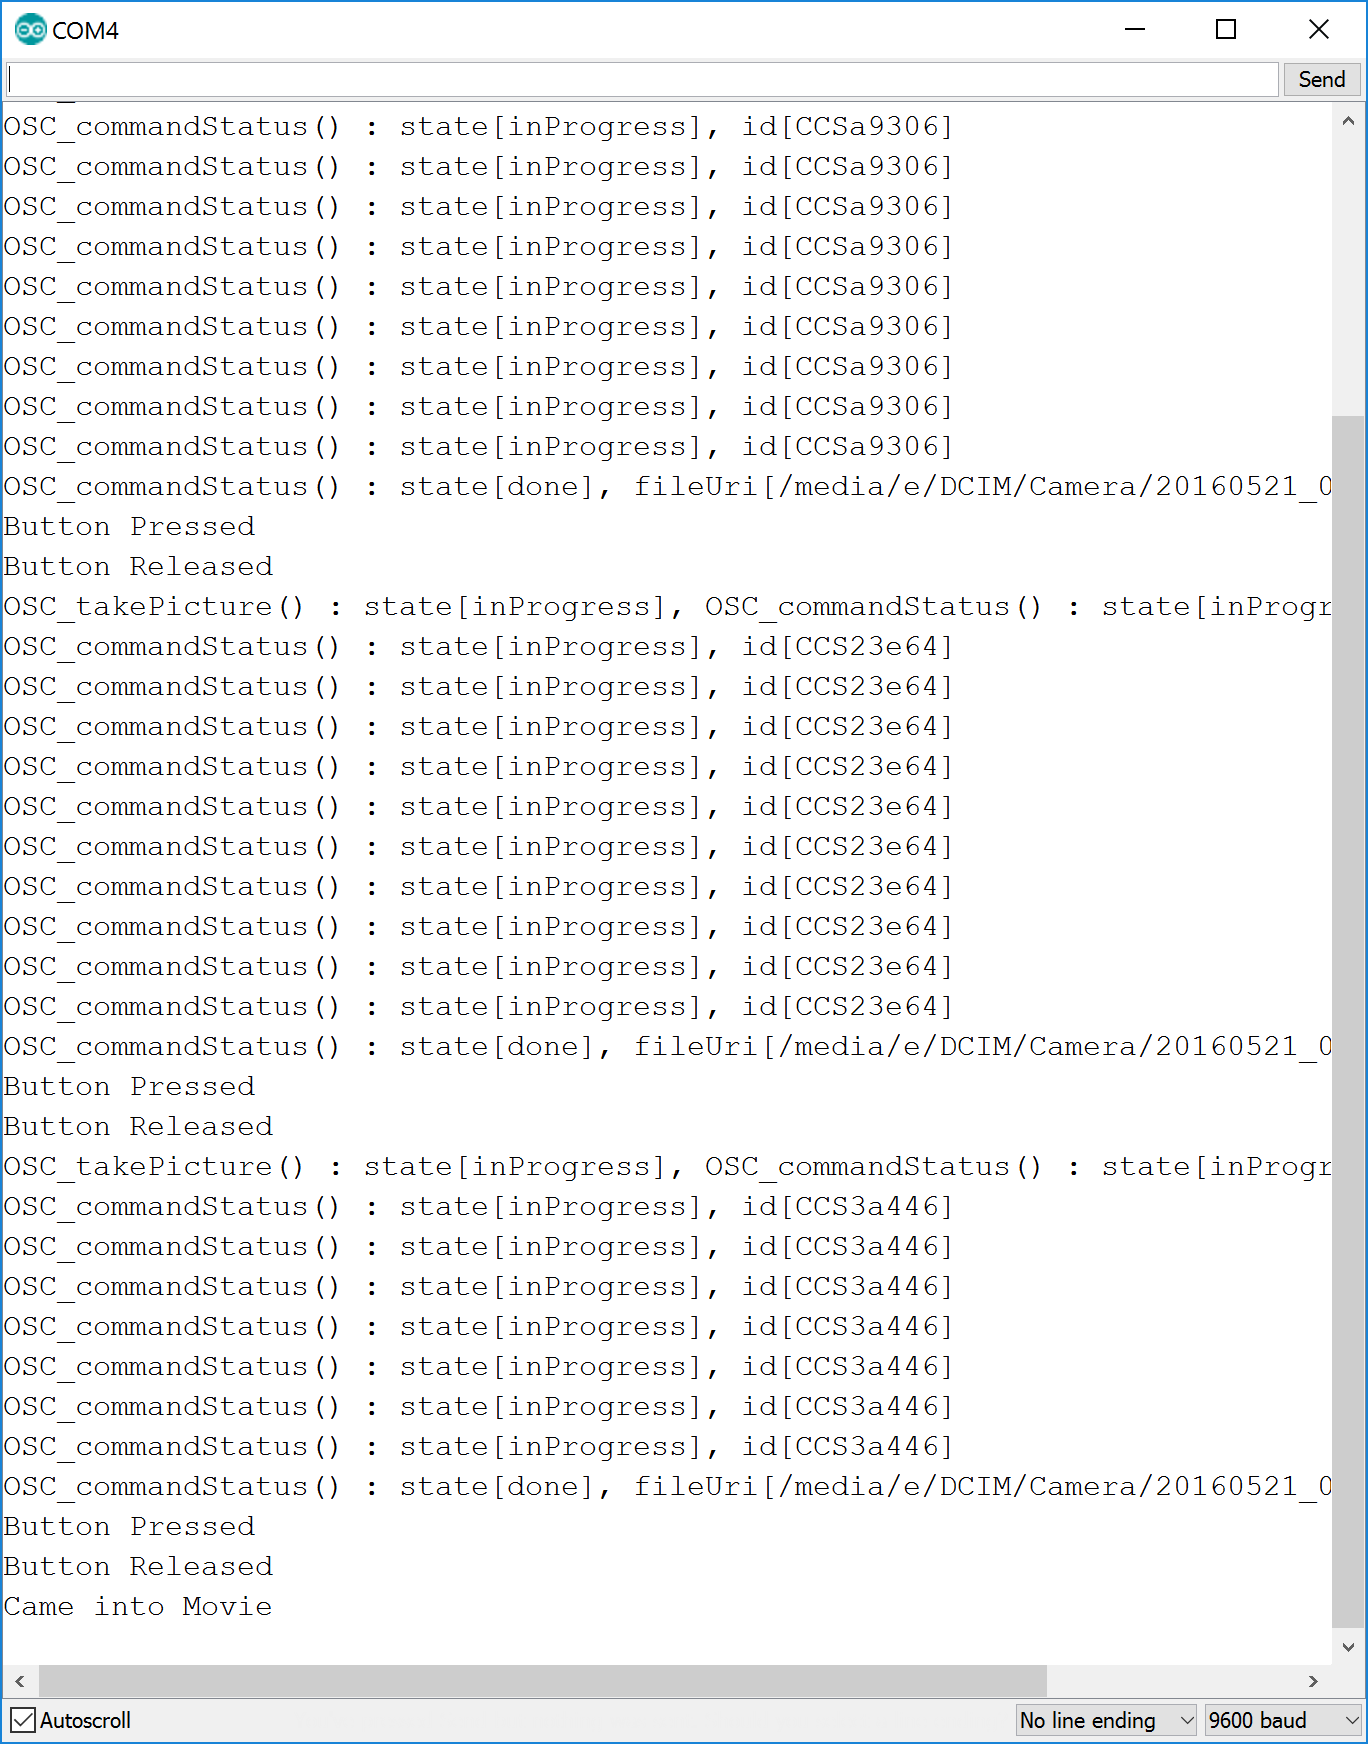
I used a handphone to kickstart the BLE connect process and left the ESP8266 to hook up to the LG 360 Cam via WiFi. Success!
Use the wires to send button press signals to the ESP8266 and I hear a familiar shutter click from the LG 360 Cam.
The Arduino Serial Monitor confirmed my findings!
Cannot wait to get my soldering set back to start the BLE integration.